
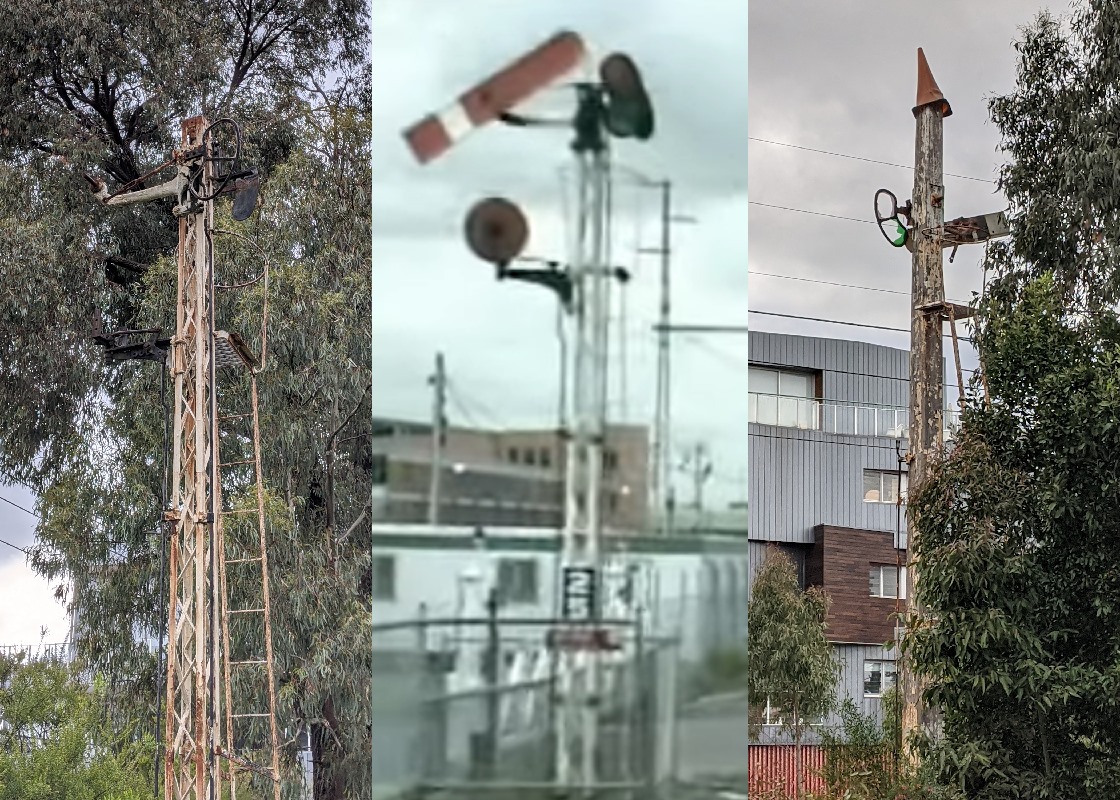
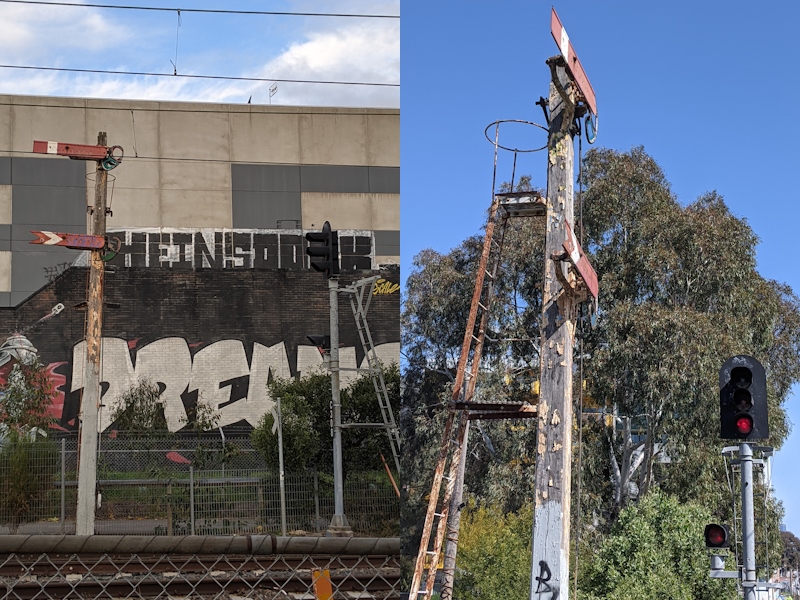
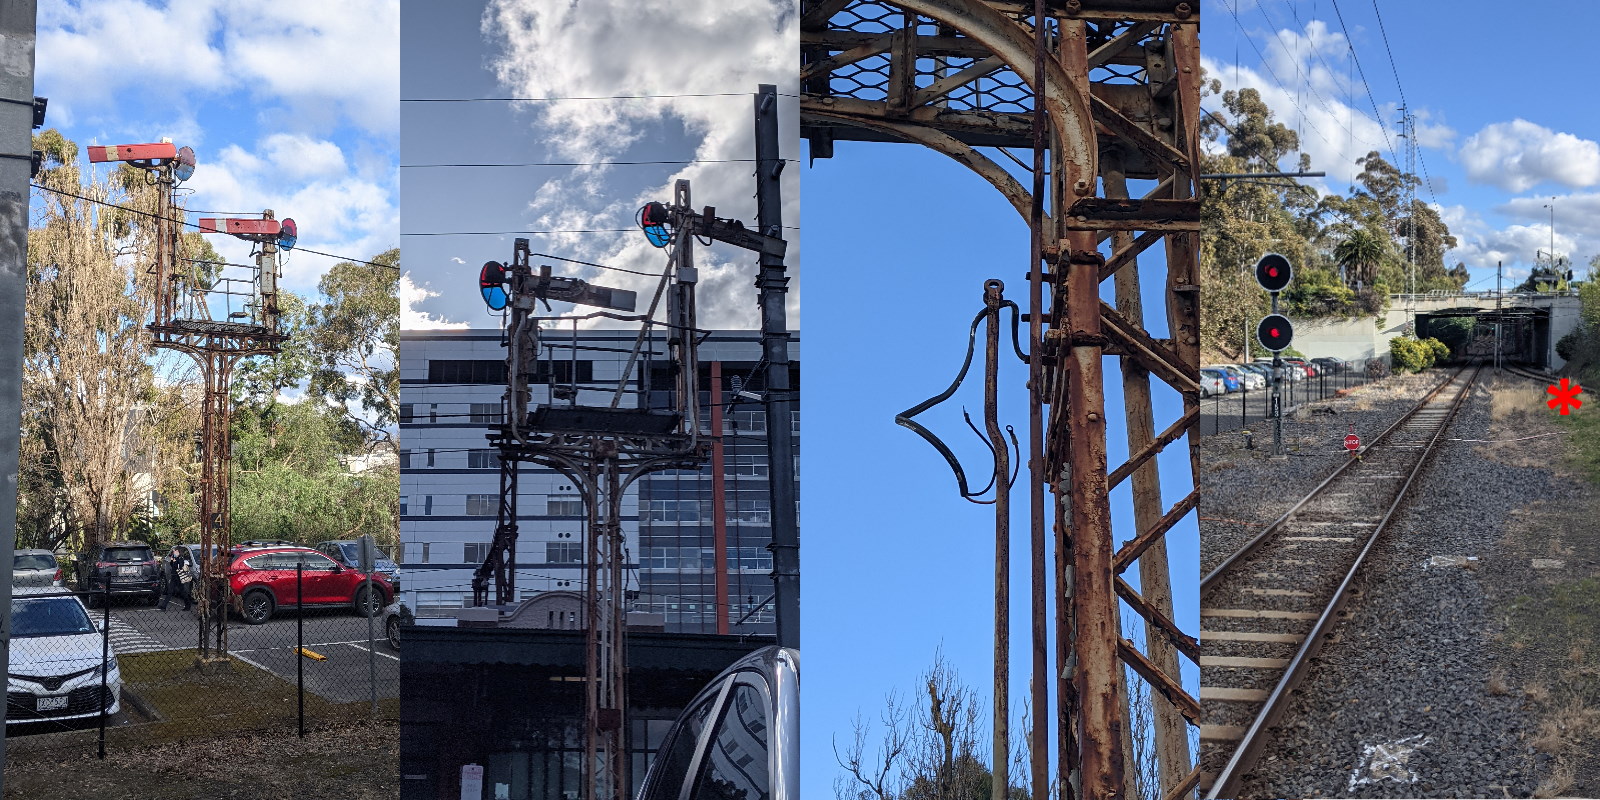
A few signal posts no longer in use from around Melbourne, in varying states of decay and refurbishment.
A few signal posts no longer in use from around Melbourne, in varying states of decay and refurbishment.
You can look at this signalling diagram (Flemington Bridge to Coburg, 1986) from the Signalling Record Society Victoria archives to see the in service locations of signals that I talk about. Excerpts from this document appear in the section below. This YouTube video shows a mostly complete down drivers of the Upfield Line in the early 1990's, showing the mentioned posts below in service.
The section of the Upfield line from before Jewell station down to Coburg (and beyond) station used to be controlled by multiple signalboxes and hand gatemen. Two position semaphore signals (read about them here (vicsig.net) or here (victorianrailways.net)) were in use. Two position signalling, as well as hand and interlocked gates were slowly being removed and replaced with three position signalling and automatic boom barriers elsewhere in Melbourne and Victoria, but the Upfield line retained the old ways up until well into the 1990's. Ideas were thrown around to shut the Upfield Line and convert it to light rail (trams), like the St Kilda and Port Melbourne lines a decade earlier. However, in 1998 all of the semaphore signals, hand and interlocked gates, and signal boxes were all replaced with automatic 3-position signals and automatic boom barriers, cutting the amount of signallers (and gatemen) required from around 19 to just 1. After those works, some semaphore signal posts remained near the Upfield line, but either turned 90° or placed out of sight of drivers to avoid confusion. Before resignalling, there were around 41 semaphore carrying posts from Royal Park to Upfield. Currently, there are 11 posts remaining alongside the line.
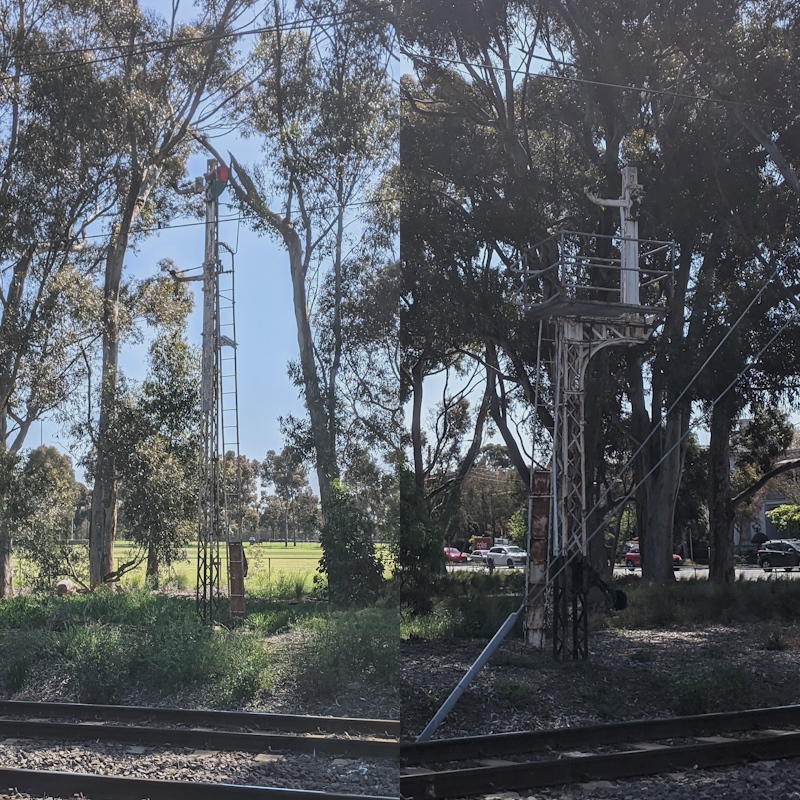
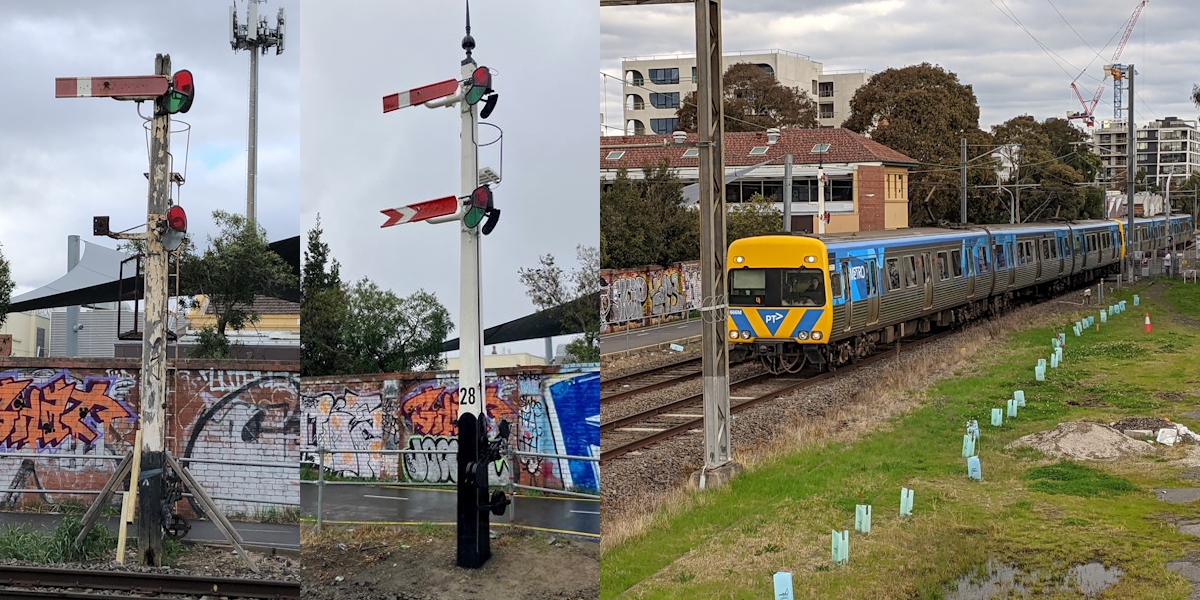
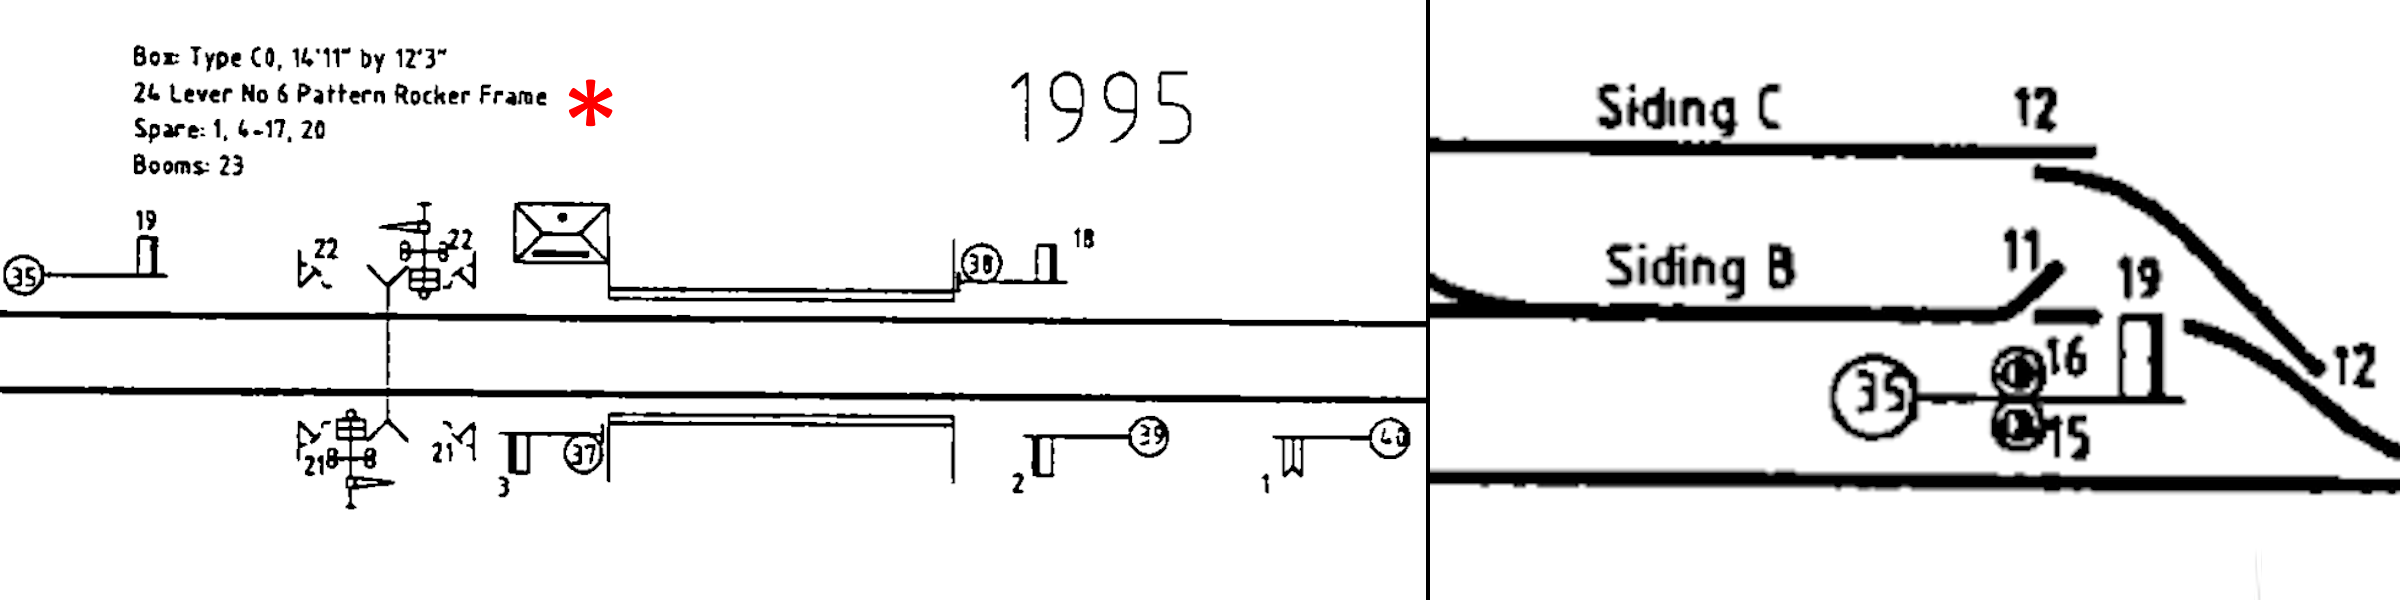
Left: Post 23. Right: Post 24B
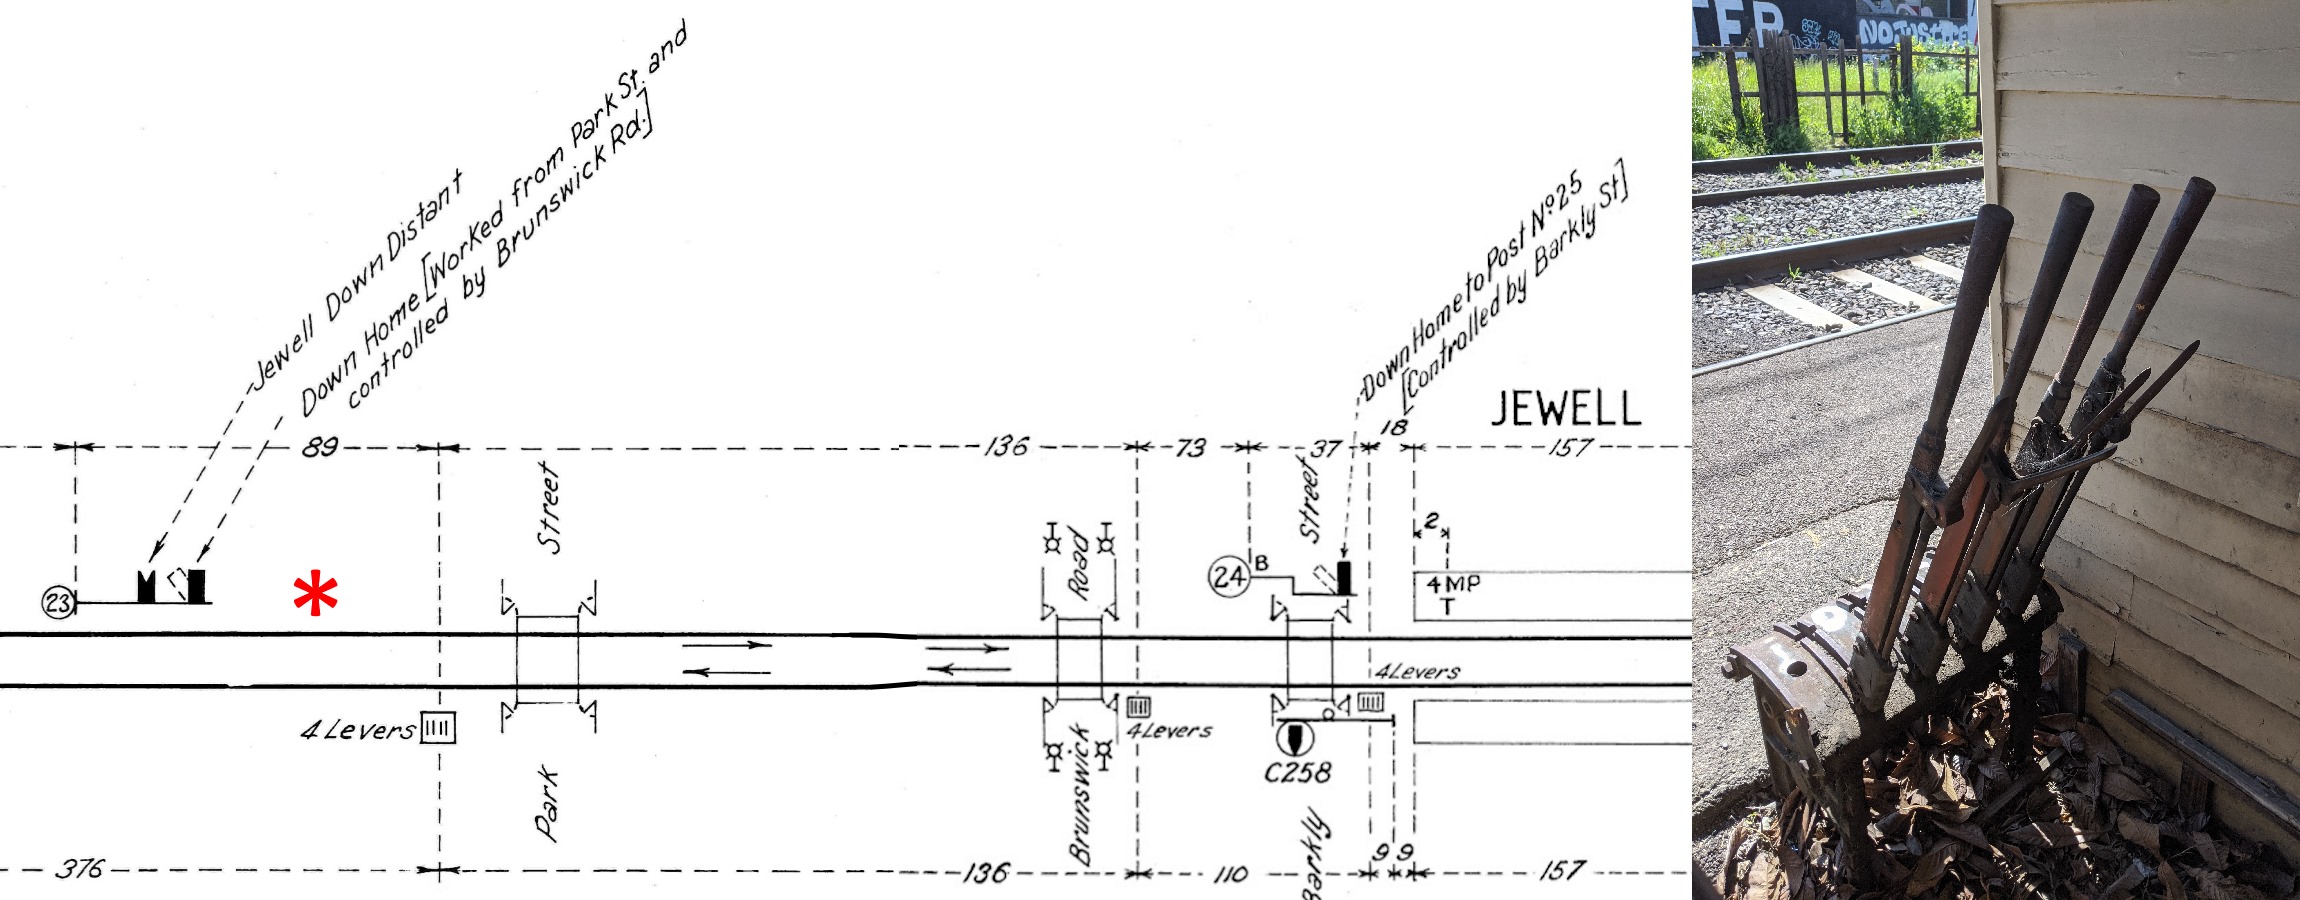
Diagram showing where posts 23 and 24B were located in service. The red asterisk shows where post 24B is today. Right Photo: Levers at Brunswick Rd. Would've controlled Post 23 Down home and C258.
Starting off right before Park St, Brunswick, we see two posts only about 60 metres away from each other. First is post 23. Post 23 used to have two arms, but we see the start of a common theme on these disued signals: missing arms and/or lenses. The top 'arm' (which still has lenses) was the down home, controlled by the gatemen at Park Street and Brunswick Road, who would've changed it from STOP (horizontal arm, red light) to PROCEED (45° diagonal lower quadrant, green light) after moving the hand gates from blocking the railway to blocking the roadway.
Since both Park St and Brunswick Rd were between post 23 and the next signal, both gatemen would have had to pull the respective lever in order for the home to go to proceed. The bottom arm was the Jewell down distant, which could only go to proceed when all signals through Jewell (and the Park Street home) were set to procced.
Post 24B was the next signal down the line, controlled by Barkly St. You can see that where the arm was is on a seperate, smaller post offset from the main post. These smaller posts are called "dolls". The arm was most likely placed offset to the right because of poor visibly behind a nearby stanchion. And yes, post 24B has been moved around 225 metres from where it was. This is will become a common theme along here...
Left: Post 25 as it is today. Middle: Post 25 in use in the early 90's. Right: Post 26 as it is today
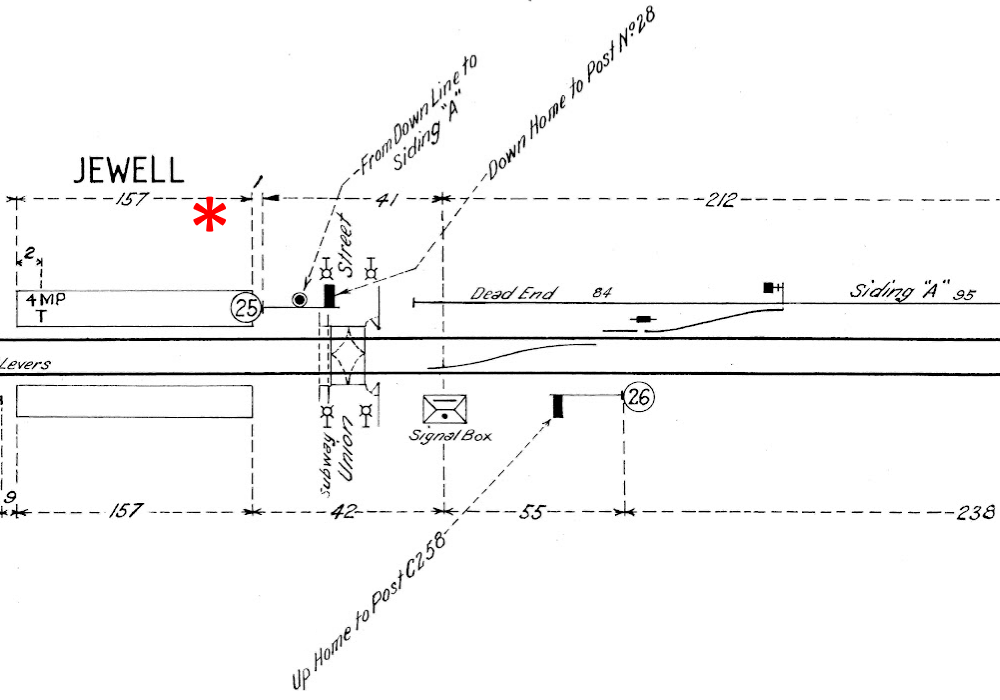
Diagram showing where posts 25 and 26 were located in service. The red asterisk shows where post 25 is today.
The signals on posts 25 and 26 were all controlled by Jewell signal box. All required the Union Street interlocked gated to be closed, and for the relevant points to be set correctly. The main arm on 25 (lever 7) took trains from Jewell platform straight ahead towards the mainline, while the smaller 'disc signal' (lever 18) on 25 took trains into siding A (until it was removed along with the siding and points in 1997). Post 26 just sent trains across Union Street into Jewell platform 1 to the next signal.
Post 26 remains almost exactly where it was (except for being rotated, and a traffic cone thrown on top of it sometime after Feb 2014), but post 25 was moved away from the track and placed in between what is now a few trees and bushes outside of the station, about 23 metres west of its former position. It still faces the same direction it did, but since drivers cannot see it from their cab, there is no confusion.
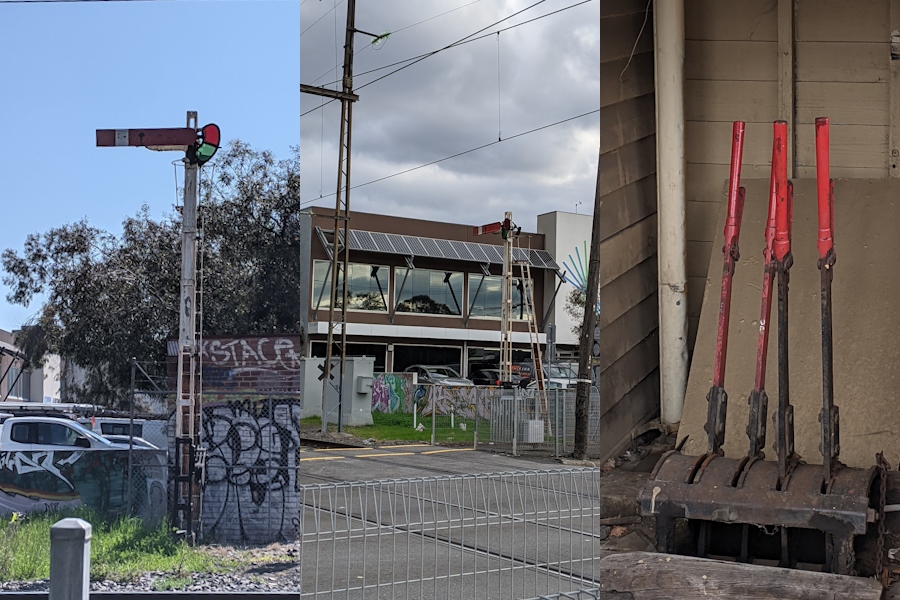
Left: Post 28 before 2022-23 restoration. Middle: Post 28 after 2022-23 restoration. Right: Comeng train passing post 28 after restoration
Left and Middle images from this Metro Trains Facebook Post.
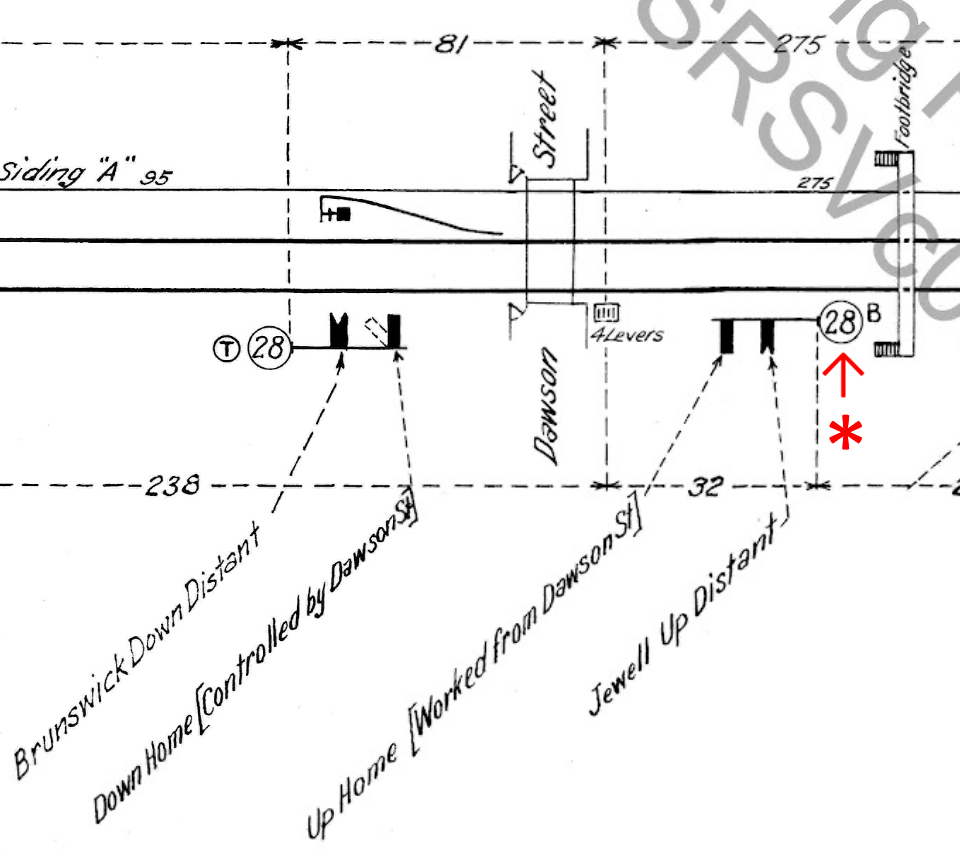
Diagram showing where posts 28 and 28B were located in service either side of Dawson Street. The red asterisk shows where post 28 is today.
This once rotting and nearly falling over post was removed in 2022 and recently loving restored by the Puffing Billy Railway, and placed back where it was in July 2023. The arms, lenses, post and rods were all renewed or replaced. Like post 23 earlier, this is a another Home and Distant combo post, the Home controlled by Dawson street and the Distant is for Brunswick.
Where this one confused me was when I looked to see where it was, and then looked at the diagram to see what it did. I found out that while it is post 28 as the number indicates, it is located exactly where post 28B was. If you look at the drivers view video I mentioned before, you can see at around 6:39 you can see wooden post 28 on the right side facing towards us, and at 6:46 you can see the metal lattice post 28B on the right side facing up trains. Seemingly when modernising the signalling in 1998 they removed all the old posts, then put some of them back as reminders of what was, but with a few mix arounds here and there. Post 28B was not put back next to the line.
Left: Post 29. Middle: Post 29 as seen across Albert Street. Right: Levers at Albert Street. The 1st has "DN", and the 2nd has "UP" faintly written on them
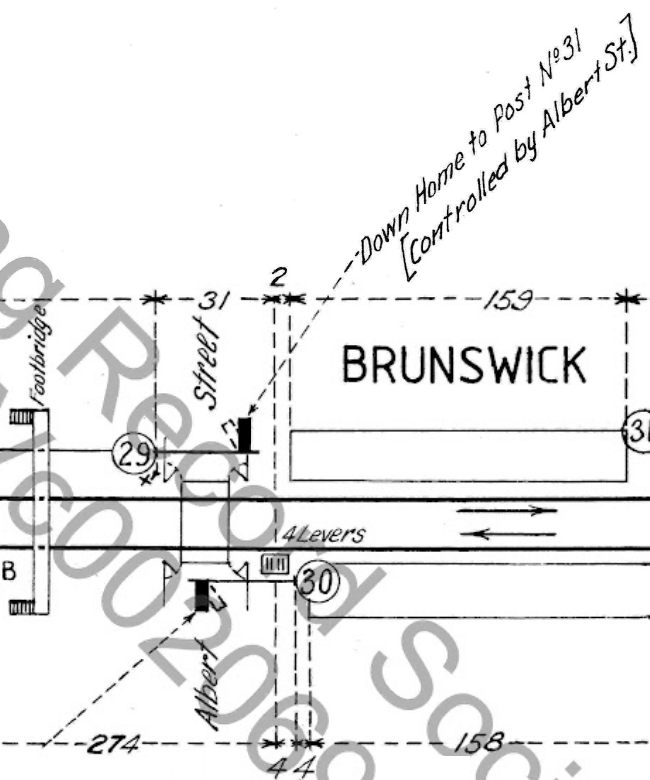
Diagram showing where post 29 was in service.
This one is pretty simple. A single home arm controlled by the level crossing right infront, sending trains into Brunswick platform 2. It was rotated and moved a few metres along and away from the line. You may recognise it as my Twitter banner. Post 30, also seen on the diagram, is nowhere to be found.
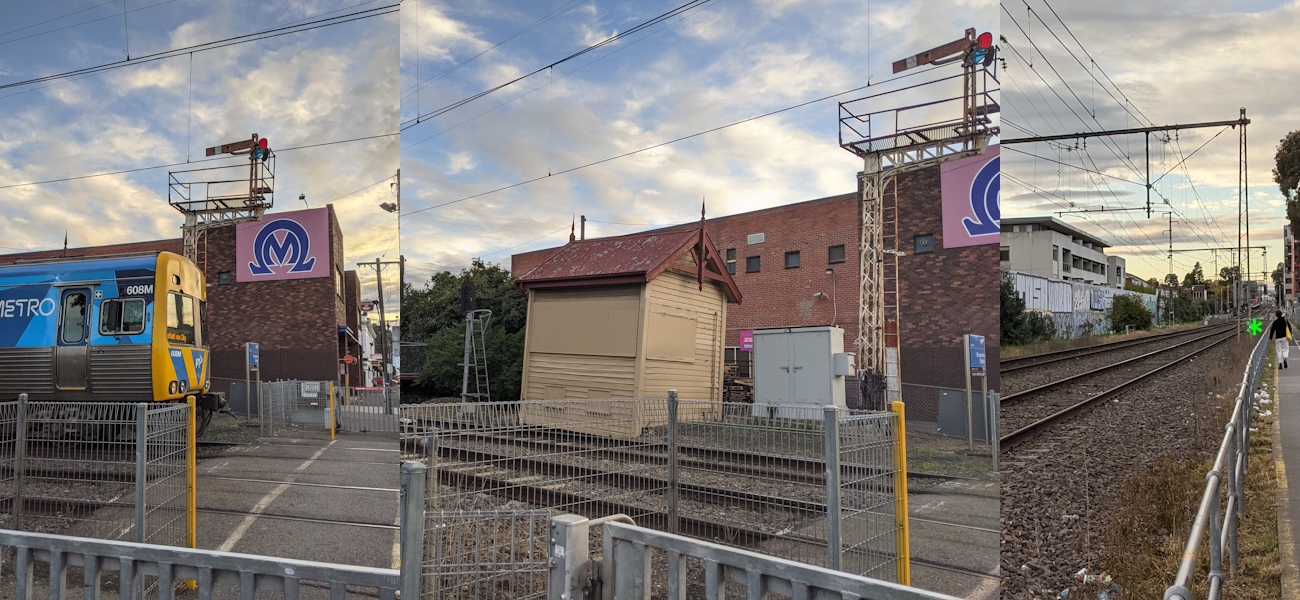
Left: Comeng train passing Post 32. Middle: Automatic signal C291, Brunswick Signal Box, Post 32. Right: Green asterisk is where post 32 used to be, behind that stanchion
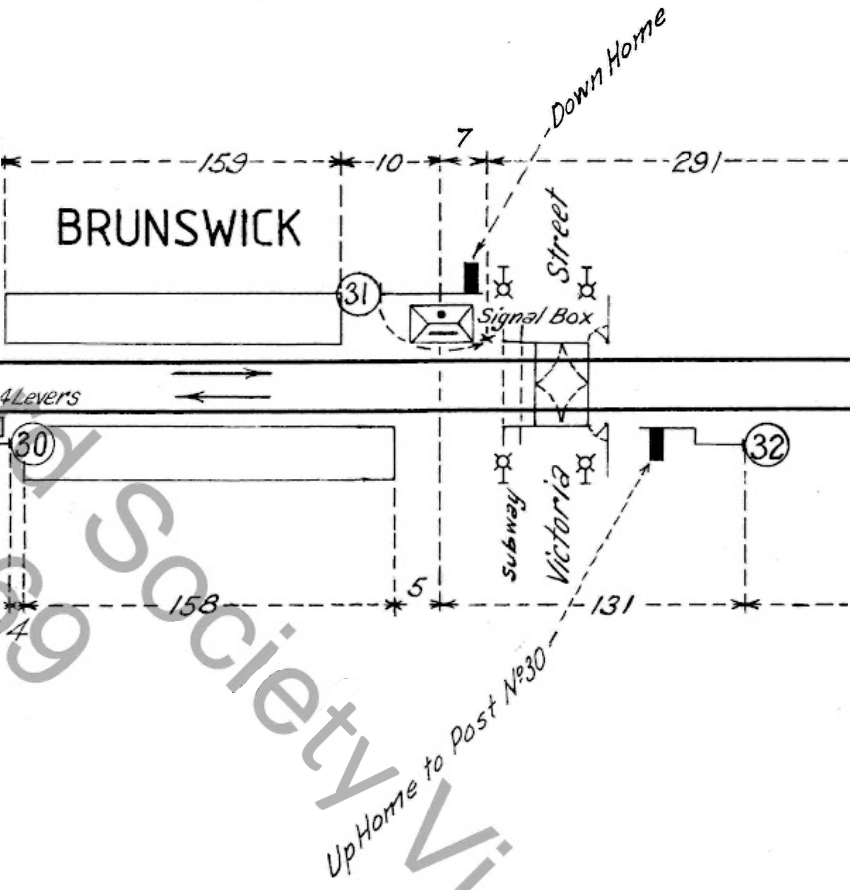
Diagram showing where posts 31 and 32 were in service.
Here is post 32, currently located where post 31 used to be. Another story of one similar looking post in the place of another. You can see post 31 then 32 from 7:22 in that video that the arm of 31 was below the railing, while the arm of 31 is above the railing. Both signals were controlled by Brunswick signalbox (pictured), and were only able to be set to PROCEED when the interlocked gates at Victoria Street were closed to road traffic.
Both pictures show post 33B next to the automatic signal the replaced it; C308
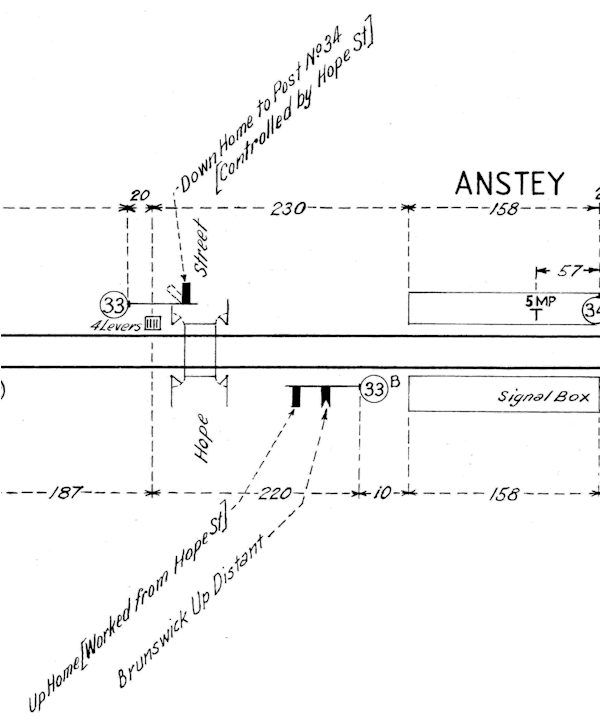
Diagram showing where posts 33 and 33B were in service.
At the city (up) end of Anstey station we see something cool: Post 33B next to the automatic signal that replaced it in 1998, C308. Post 33B was another level crossing Home and Distant combo, the Home being controlled from Hope Street and the Distant being for Brunswick.
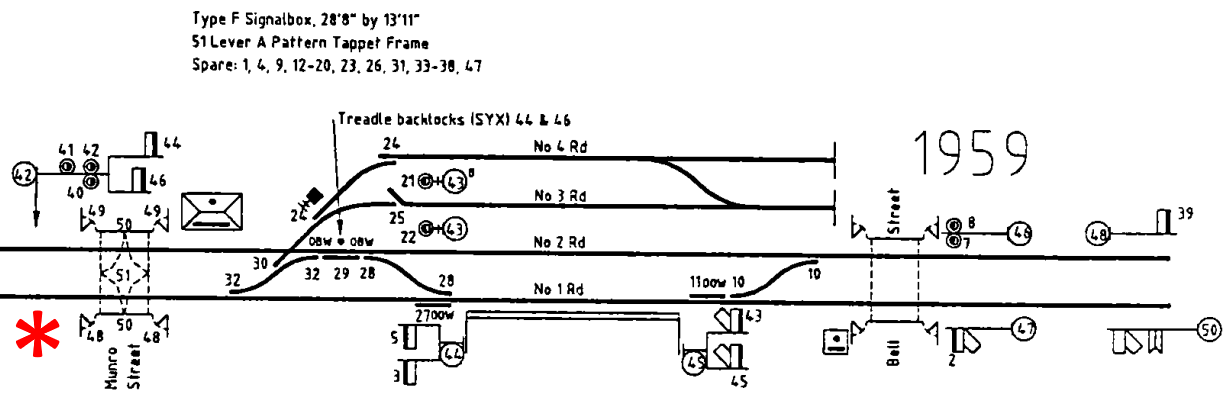
After Anstey we enter the LXRP territory, where Moreland Road, Reynard Street, Munro Street, and Bell Street level crossings were removed and 2.5km of the railway raised, with Moreland and Coburg stations rebuilt. Works were completed in 2020. As part of the project, three sempahore signal posts that were decaying along that section of line were removed, refreshed, repainted and placed back approximately where they were after the works were done, each accompanied by a small information board next to them.

Left: Post 35 next to Moreland signal box. Middle: Inside Moreland signal box. Lever 19 is the closest red lever to the camera. Right: Infomation sign about "Signal 35"
Left: 1995 diagram of Moreland, showing which levers in the signalbox controlled what. The red asterisk shows where post 35 is today. Right: 1940 diagram showing the two discs, 16 and 15, on post 35, removed in 1988. Both of these are from vrhistory.com.
Here's Post 35. Prior to LXRP works it was as rusty as some of the others along the line, but as previously mentioned it was removed, repainted and put back. The previously covered up 24 lever Moreland signal box also received the same treatment. If you peer inside you can see the around 8 levers that were left when the signal box was closed: 2, 3, 18, 19, 21, 22, and 23. From 1900 to 1988 twenty levers were in use! The lever that controlled the Home signal on post 35 was lever 19, the closest signal lever on the image above.
The protruding black shape on the left used to hold a disc, 16, with another one on the other side, 15, for trains leaving sidings C and B next to where post 35 was. The sidings and discs were removed in 1988.
If you read the information sign, it says "Signal 35 is one of 14 semaphore signals along the Former Coburg Railway Line". This is incorrect. There were 29 semaphore carrying signal posts from Royal Park to just past O'Hea's Road prior to 1998, with 39 Home or Distant arms on those posts. Where did they get the number '14' from? Keep reading.
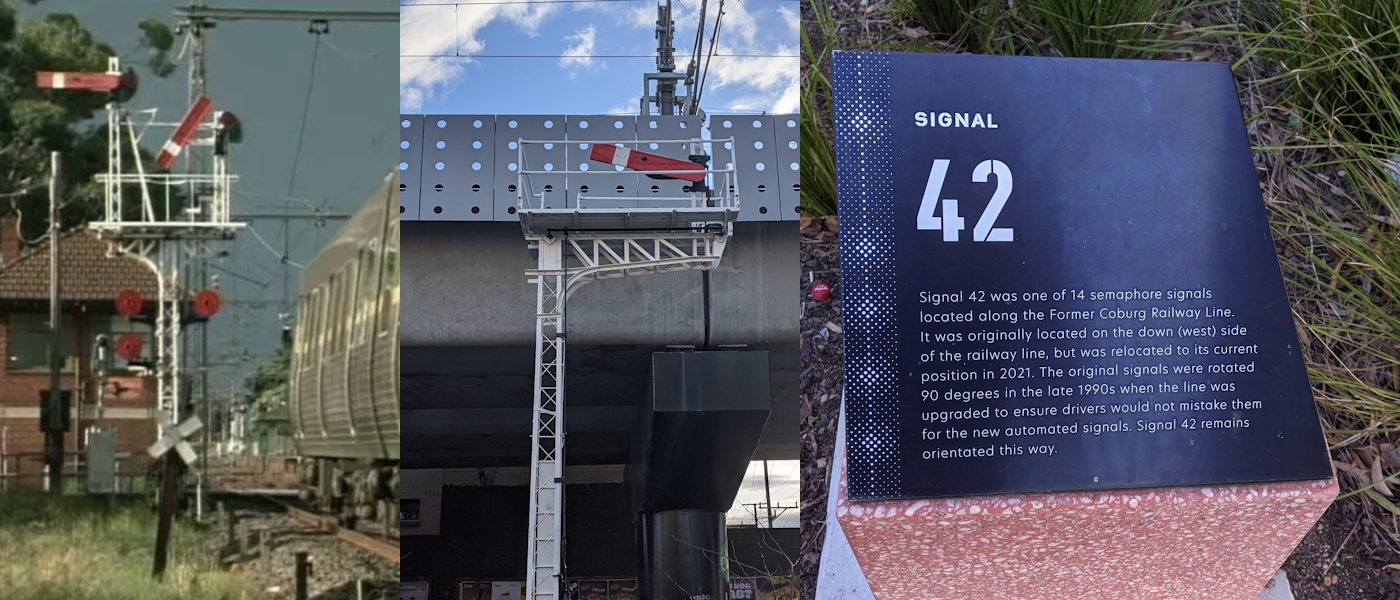
Left: Post 42 as it looked before 1997. (First scene of this video). Middle: Post "42" at Munro Street as it looks today. Hang on... Right: Info sign about "Signal 42".
1959 diagram showing post 42 in its prime (1959-1997). Red asterisk marks where a post is today. From vrhistory.com.
Compare the left and right images of post "42" above. They look nothing alike, right? The left photo shows two arms, and three discs, while the one on the right only has one arm, lower down than any of the ones in the left photo. Furthermore, the metal truss on the left is missing, and the right truss is longer? What's going on?
Turns out, this is not actually post 42, despite being in the location of post 42 (especially before LXRP works).
This is actually post 31, which I mentioned earlier, that used to be the down Home at Brunswick, where now post 32 currently resides. For whatever reason, back in 1998 when they put back a few old posts, some got mixed around, like the aforementioned 32 and 28. Post 31 ended up here, at Munro Street, despite orignally standing 2.5km away. This is the furthest a signal has "drifted" along the Upfield Line.
Unfortunently, despite being so beautiful, post 42 doesn't seem to exist anywhere anymore.
The information sign incorrectly states that this is "Signal 42", while also reiterating that '14' number.
Another thing, while the LXRP did give this post a fresh coat of paint, they didn't replace lost parts, like the missing lenses on this signal here. Neither did they remedy the slight upper quadrant tilt the arm has been exhibiting, likely from when it was originally removed.
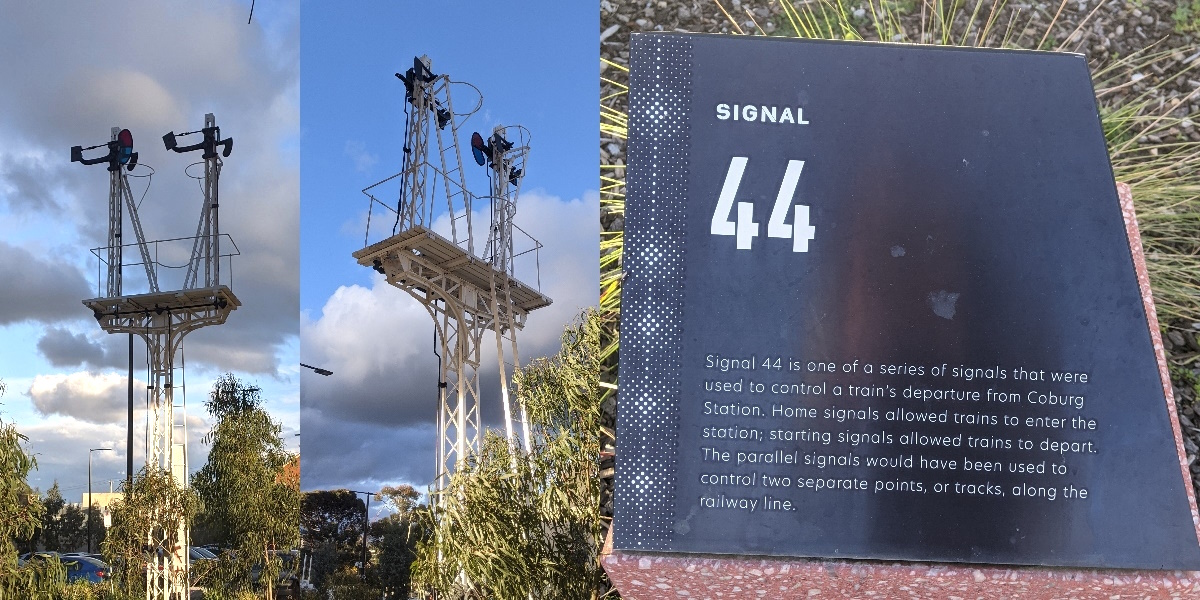
Left and Middle: Post 44 near Coburg Station. Right: Information sign about "Signal 44"
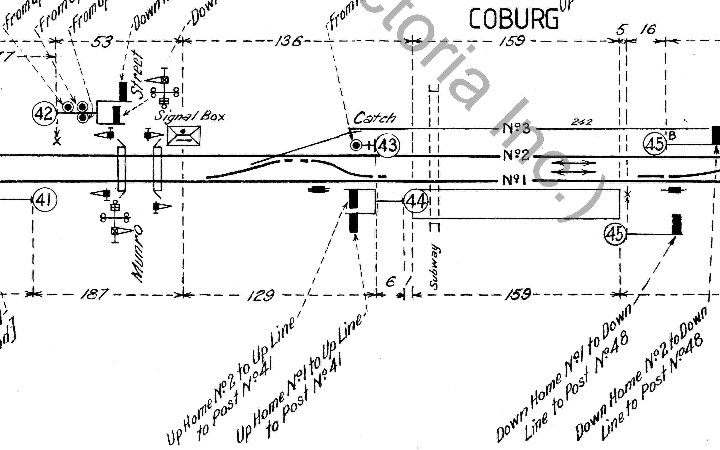
Diagram showing Post 44 at Coburg
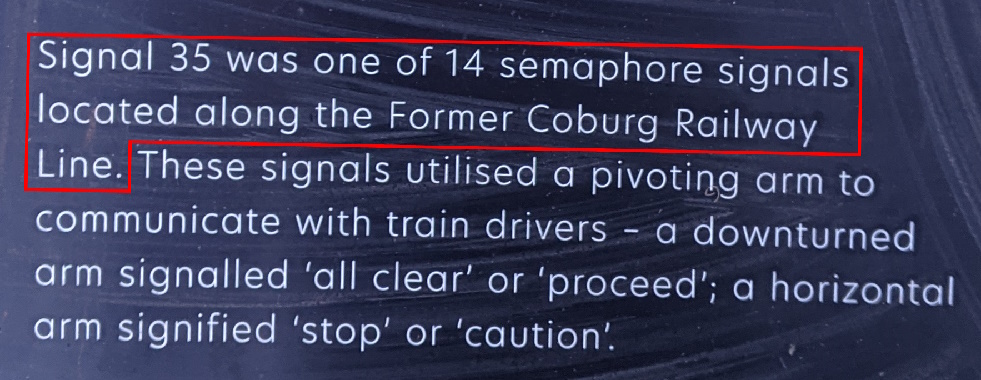
"Signal 35 was one of 14 semaphore signals located along the Former Coburg Railway Line."
But where did the LXRP pull the number 14 from? If you go back along this blog post and count the number of arms there are (or were), you will come to the number '15'. However, the distant arm remains on 23 are pretty easy to miss, so one may count '14'. This is might be where they got it from. Again, there were around 29 signal posts, with about 39 Home or Distant arms before resignalling.
A couple on the Hurstbridge Line
From left to right: Post 4 viewed from Heidleberg platform 1, Post 4 backside, closeup of where the disc was and its electric lamp wires, up view today with post 4 position marked with red asterisk.

1972 diagram of Heidelberg, showing Post 4.
Click here or here to see Weston Langford photos from the 1990s showing Post 4. Still looking good, despite installed in, I believe, 1912.
Here is Post 4, at Heidleberg on the Hurstbridge Line. The signal has two home arms, and had a disc on the left. Right arm was for trains going from No.1 to the Up line towards Melbourne, Left arm for was No.2 towards Melbourne, and the disc was from No.3 (siding) towards Melbourne.
In the 3rd image, you can see some wires where the disc was. This seems to be wires for the electric lamp, which would have been behind the disc lenses, which would give a red or green light towards drivers at night.
Underneath each home arm you can see a box that the rod also goes into. This is called a reverser. This is for detection of the arm's position, and gives a colour light indicator above the lever to the signaller, useful to see the indication of a signal under a signallers control that they cannot easily see themselves.
The post was decommissioned in 1994, along with other remaining 2 position posts here, and replaced with 3 position signals. The mechanical frame was replaced with a unit lever panel in 2000.
Signalling Record Society Victoria for all of your signalling record needs.
vrhistroy.com with "Victorian Railways Resources", with documents including all signalling changes to many locations, including the Upfield Line.
Upfield Line Trackside and Signal Box, early 1990's - Melbourne, Australia Youtube Video. Shows inside Jewell signal box, as well as some lineside shots.
Victorian Rail - A Run To Upfield, early 1990's, semaphore signals and manual gates galore! Youtube Video. Mostly uncut Upfield Line drivers view.