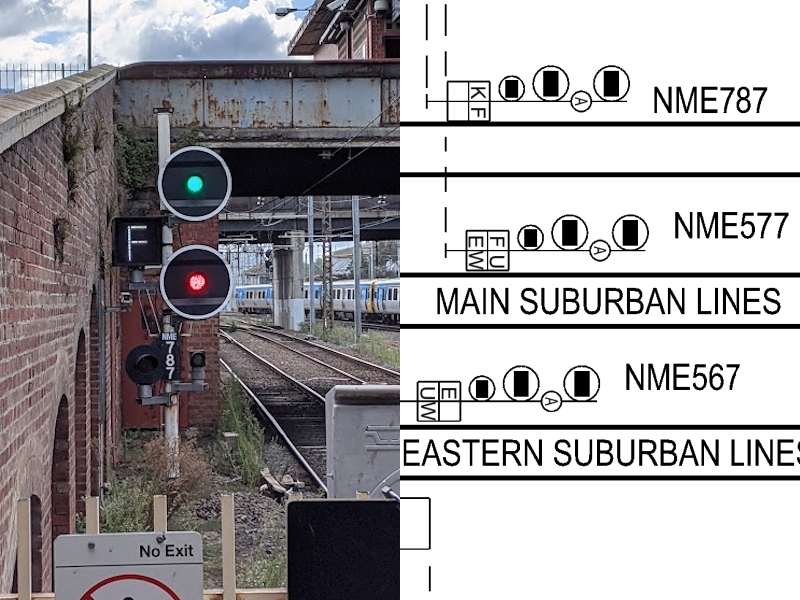
Signal NME787 showing clear normal speed and indicator letter 'F' | Signal diagram showing relevant signals
Signal NME787 showing clear normal speed and indicator letter 'F' | Signal diagram showing relevant signals
Route indicators are found right before junctions, and tell a train driver what route the tracks are set for. The route indication only appears when the signal is at proceed (anything other than Red/Red). They aren't found at every signal before a junction or set of diverging routes, only if any the relevant points aren't easily visible, or if more than one route uses the same speed. While the interlocking prevents a signaller from routing two trains into each other, it does not stop a signaller from routing a train to the wrong place, eg. routing an Sunbury train towards Upfield. While it isn't catastrophic if a train runs past a signal at proceed with the tracks set for the wrong route, it sure isn't fun for anyone, signallers, train controllers, and passengers alike.
There are a few different kinds of route indicators, two of which are seen here at North Melbourne station. The type of route indicator we will look at first is the 'Letter' type. This is in the form of a lit white letter, usually one (but in some places two), that corresponds to the route set from that signal.
Right after North Melbourne station, in the down direction, lies the junction for trains heading out to the suburban destinations of Werribee/Williamstown, Sunbury, Craigieburn, and Upfield.
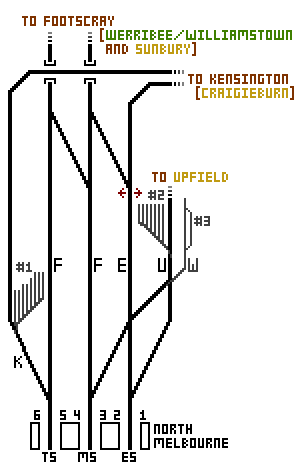
Diagram showing routes north from North Melbourne station. A black line means an up/down track pair
There are six tracks that run through North Melbourne, in three up/down pairs.
1. The East Suburban lines (ES on the diagram), which run through platforms 1 & 2, and typically carry Craigieburn and Upfield trains.
2. The Main Suburban lines (MS on the diagram), which run through platforms 3 & 4, and typically carry Sunbury trains.
3. The Through Suburban lines (TS on the diagram), which run through platforms 5 & 6, and typically carry Werribee/Williamstown trains.
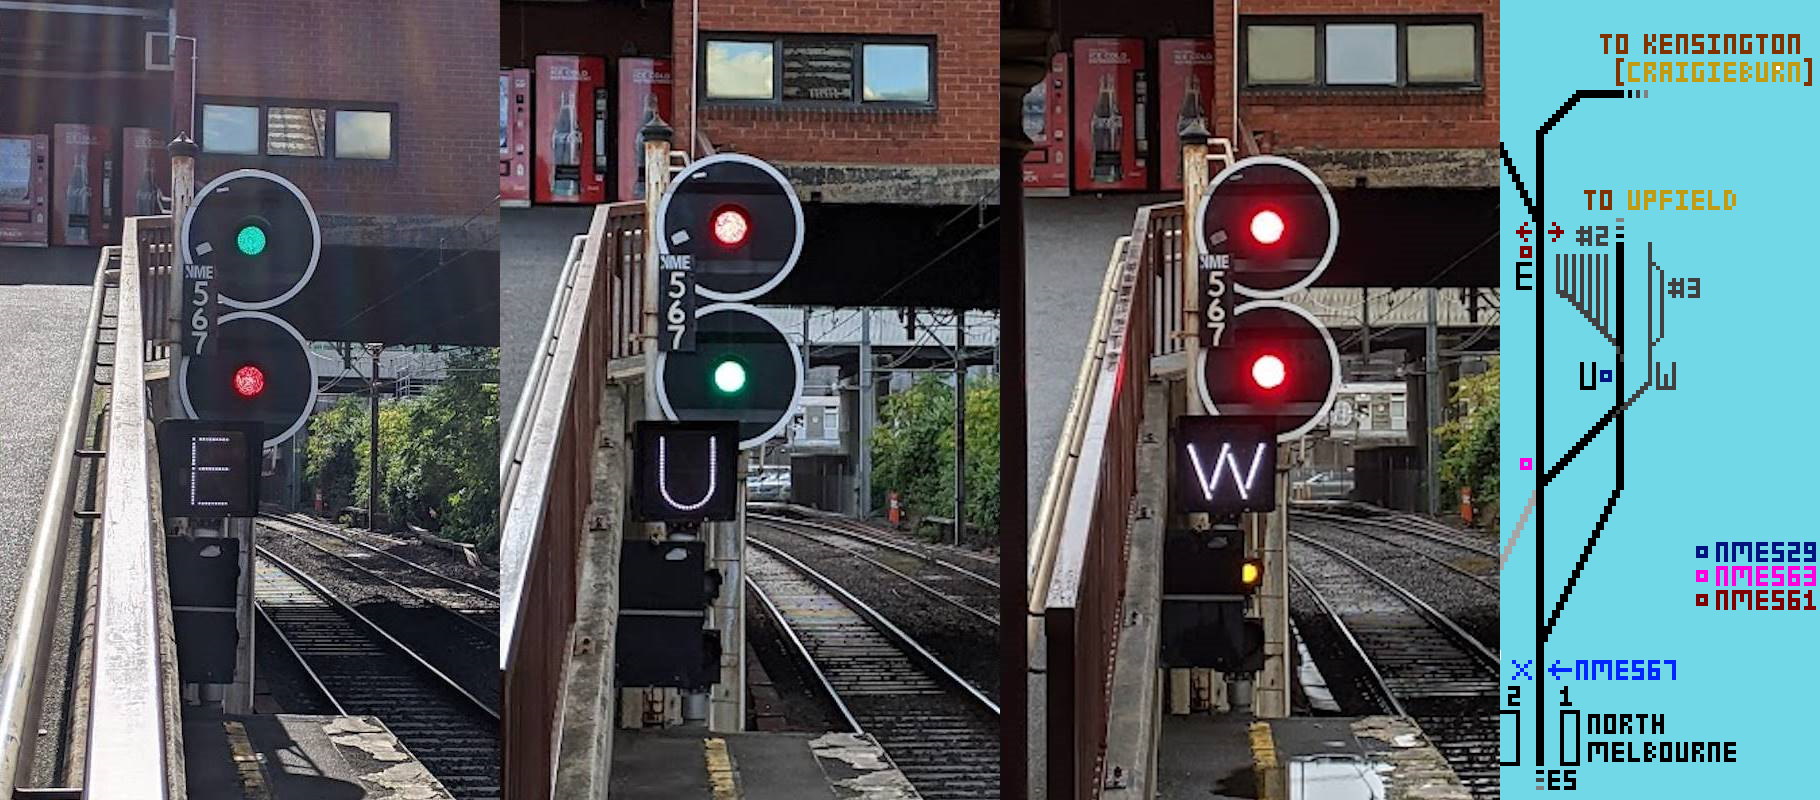
Three photos of NME567 showing all the letters it can show, and then a diagram showing the routes from that signal.
This is home signal NME567. It lives at the end of platform 2, on the down East Suburban line. It can show three lettes: 'E', 'U', and 'W'. 'E' means 'East Suburban', basically meaning the route is set straight ahead, not onto the Upfield diverge. This is what Craigieburn (and Seymour/Shepparton Vline) trains take. 'U' is easy, it means right at the first diverge towards signal NME597 (the blue sqaure next to the letter U), which takes you to Upfield, or into the Macaulay Stable sidings and Light Repair facility (#2 on the diagram). 'W' is interesting, it means the route is set for the unwired 'Arden St' siding (#3 on the diagram). This is used once a weekday by Vline, who stores a 3 or 6 car Vlocity set between peaks. Note the speeds for each route, indicated by the signal aspect. The 'E' route is normal speed, as it is the straight route (Ignore those red arrows for now). The 'U' route has a medium speed aspect, as it takes the diverge at the points. The 'W' route gets a low speed caution (notice the small yellow light under the red/red), because the route ends in a dead-end siding. Another thing, the route to the Arden St siding first goes through the straight at the first set of points, before going across at the second set of points to the Upfield tracks. You can't access the Arden St sidings if you take the first diverge.
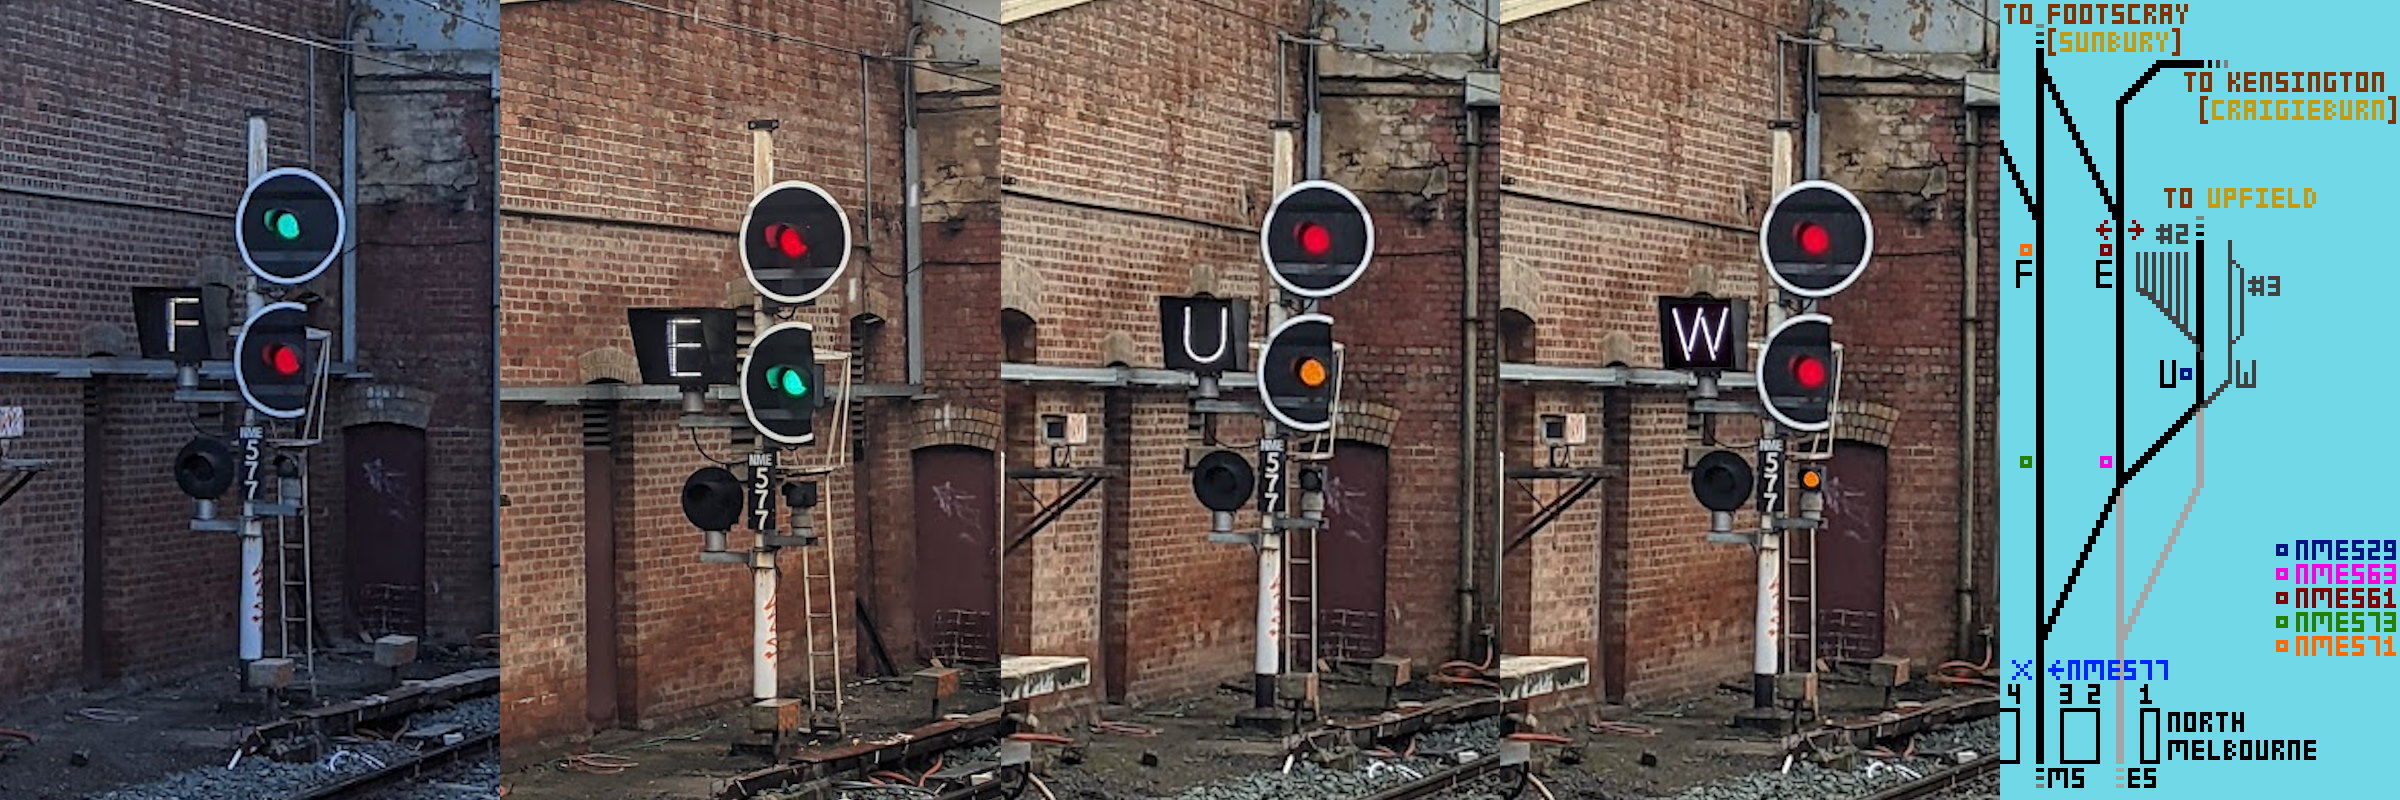
Four photos of NME577 showing all the letters it can show, and then a diagram showing the routes from that signal. I don't have a photo for the 'W' indication here, so enjoy the chopped together edit!
From NME577, we can access all of the destinations that NME567 can, as well as straight ahead to Footscray, indicated by 'F'. Both the 'E' and 'U' routes now both require a medium speed aspect, as they have to use the diverge at the first set of points past the signal. 'W' still needs a low speed caution, again due to it being a dead-end siding. It's now time to talk about the red arrows, seen above the 'E' on the diagram. These are arrow route indicators, which I'll show in detail later on. All the 'E' route really does is take you from the signal you're at to signal NME563 (pink sqaure), which then takes you to NME561 (maroon sqaure, under the arrows). At NME561, a left arrow can take you towards Footscray, while a right arrow takes you towards Kensington (and eventually Craigieburn).
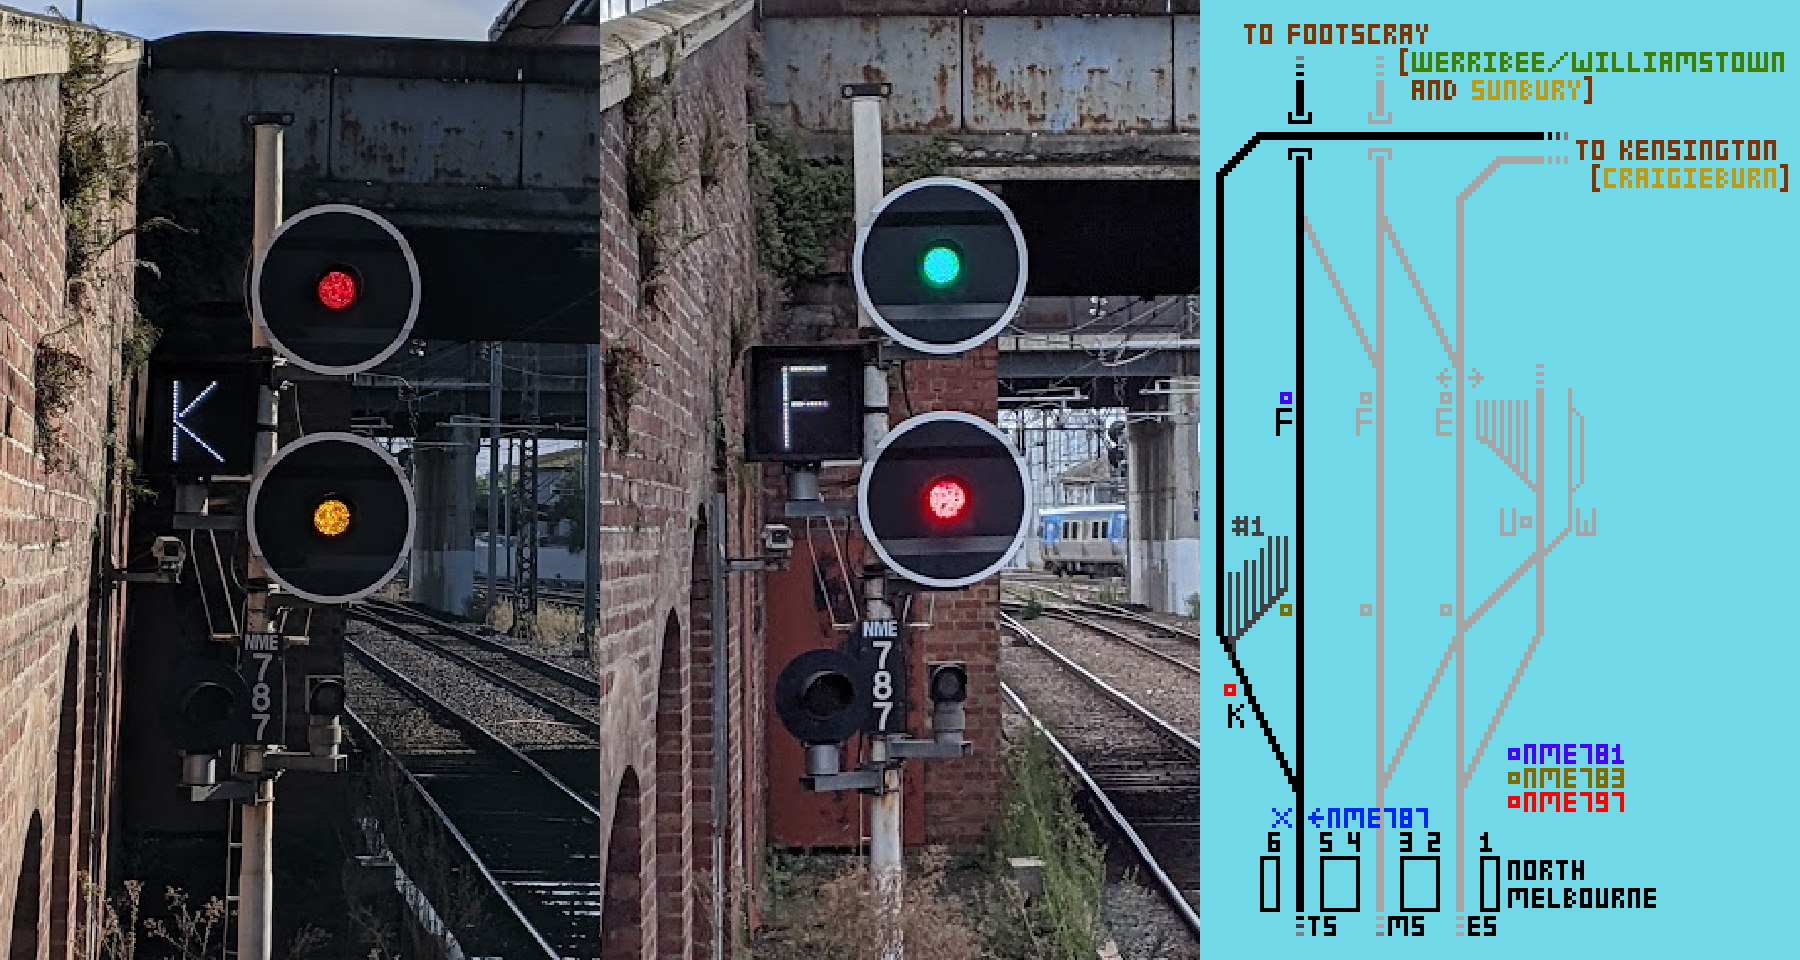
Two photos of NME787 showing all the letters it can show, and then a diagram showing the routes from that signal.
From NME787, there's only two routes. 'F' takes us straight ahead towards Footscray. 'K' takes us on the flyover over the Footscray towards Kensington, via signal NME797. It joins with the other line to Kensington just before Kensington. This route is normally only used during disruptions or Flemington Racecourse/Showgrounds trains. The 'K' route also allows us to access the North Melbourne stabling sidings (#1 on this diagram). The 'F' route, being straight at the points, is normal speed, while the 'K' route is normal speed.
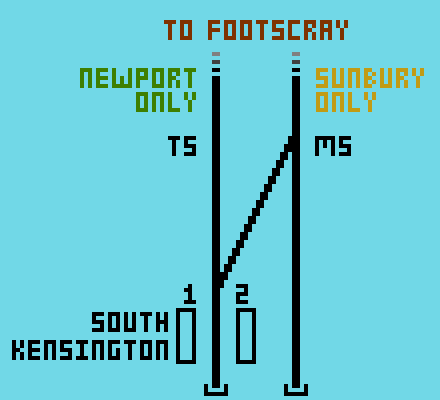
The crossover at South Kensington
In the above diagrams, you can see that there are 4 tracks (2 lines) heading from North Melbourne towards Footscray. The left track, Through Suburban, is for Werribee/Williamstown trains (going through Newport). The right line, Main Suburban, is for trains to Sunbury. However, after South Kensington station (located between North Melbourne and Footscray, on the Through Suburban tracks only) exists a crossover from TS to MS. This means a Sunbury train, on the TS line for whatever reason, like a disruption, can crossover to the correct line.
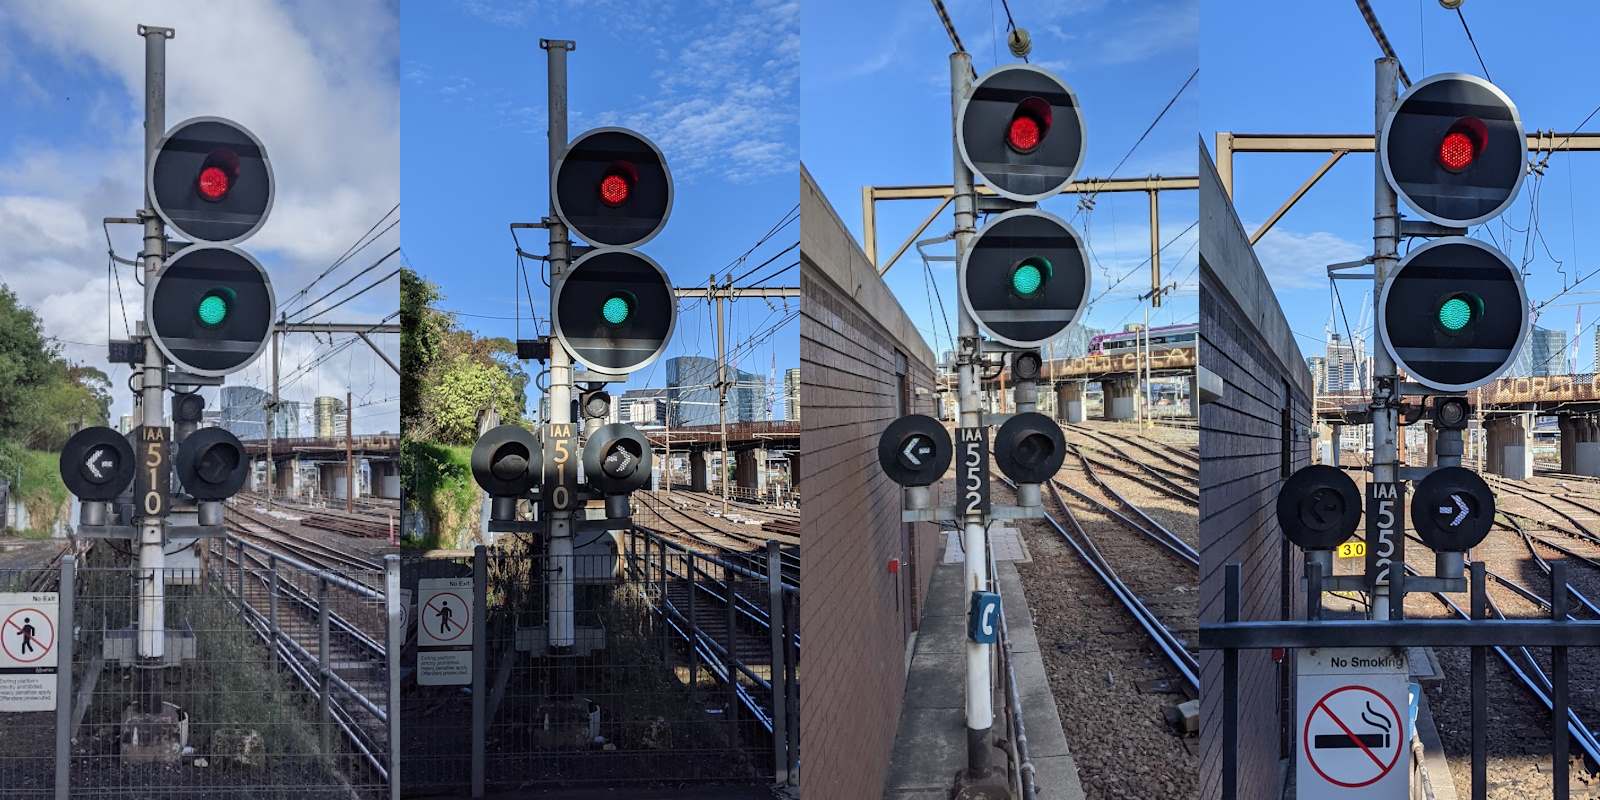
From left to right: IAA510 left, IAA510 right, IAA552 left, IAA552 right. I need to take some more photos...
At the other end of North Melbourne (the up end, the south end) are three signals for the up East, Main, and Through Suburban lines. The signal on the Through Suburban (NME800, end of platform 5) is an automatic signal, so we'll just forget about it. The other two signals, IAA510 on the East Suburban and IAA552 on the Main Suburban, exist right before the respective entrances to the City Loop (IAA means "Inner Area A"). The City Loop is bidirectional, and, around noon on weekdays, switches direction. Both IAA510 and IAA552 have left and right white arrows, left being for the surface lines to Southern Cross, and right being for the City Loop ramp.
I recommend this video to get a greater understanding of the tracks going through North Melbourne: Southern Cross + North Melbourne Junction - Explained!
Here's the original twitter thread: North Melbourne Letter Route Indicators!! (thread)